

Moodle LMS offers you to create complete online learning portals easily. With more than 2060 plugins contributed by the community developers it is easy to extend Moodle’s functionality to meet your organizational requirements. In this post, we will see Custom Certificate plugin which allows you to dynamically create certificates with user data.
Custom Certificate is mainly intended to be used to create course completion certificate when the user completes a course in Moodle. It can help you automatically generate a PDF certificate populated with the user data like Course Completion date, User Name, Course Name etc.
The Custom Certificate plugin is one of the most popular Moodle plugins. It is the most downloaded activity type plugins in the last 12 months with more than 30k downloads and fourth most downloaded overall. You can download the latest version of Custom Certificate plugin from the official Moodle plugins directory here. In case you are new to Moodle, please follow this guide to learn how to install a Moodle plugin.
Once installed, you can use the Custom Certificate plugin in your course based on the configurations by your site administrator. Let’s see how you can use it to create automatic certificates in your Moodle course:
How to use Custom Certificate plugin?
The custom certificate allows you completely customizable PDF certificates right from your Moodle. You can customize your certificate design using your browser and Moodle. There is no need to access server through FTP to customize the certificate.
The plugin provides one of the easy and optimized way of customizing certificates in Moodle. The teacher can itself create its own certificate without any major technical knowledge. The administrators can create site-wide templates which can be used by teachers when adding a certificate to a course, saving them from re-creating the same certificate over and over again.
The plugin have options to send emails to students, teachers as well as other users when the certificate is ready. It also comes with handy feature to verify the certificate with a unique code. You can also configure to let students spent required minutes in a course before they will receive the certificate.
All the certificates issues to a student will be listed under My Certificates page under the profile page.
How to Add Custom Certificate in your course?
In order to add a custom certificate to your Moodle course, please follow these steps:
- Enter the Editing Mode by clicking the ‘Turn Editing On’ toggle.
- Navigate to the section where you want to add the certificate, generally it is kept in the last section of the course.
- Click Add an Activity or Resource and choose Custom Certificate. It will take you to the settings page
- Enter a name and description for the custom certificate which will be displayed on course page.
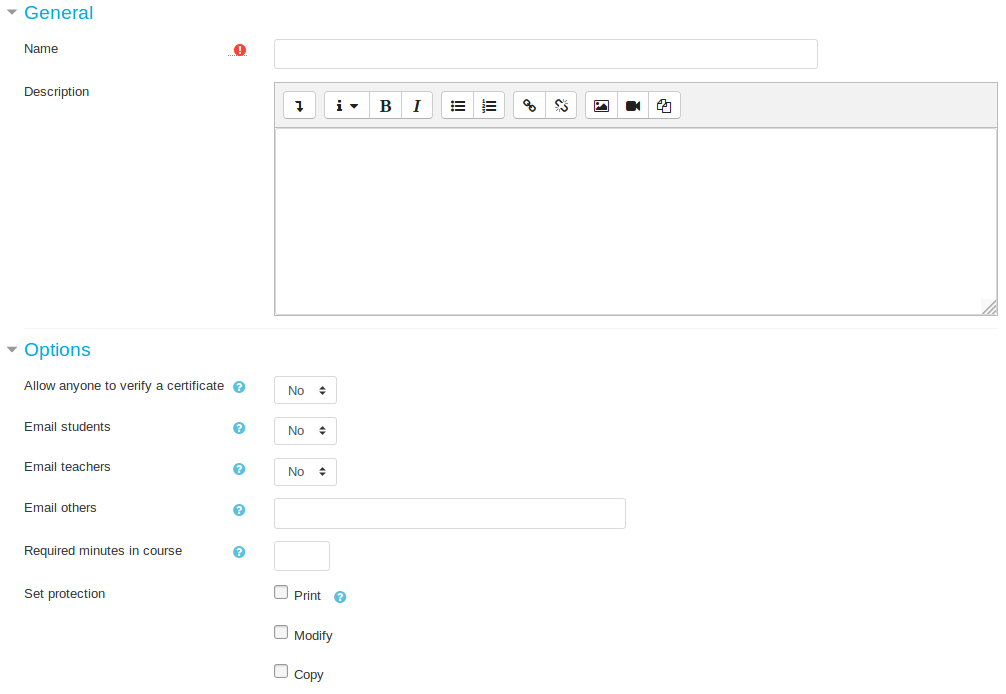
- Under the Options section:
- Delivery options – You can choose either to force download the PDF certificate or display it in browser.
- Email students – If set Yes, this will send an email to students a copy of the certificate when it becomes available.
- Email teachers – If set Yes, this will send an email to teachers a copy of the certificate when it becomes available.
- Email others – You can add any other email addresses (separated by comma) who will receive the certificate copy.
- Allow anyone to verify a certificate – This allows anyone (not logged in Moodle) to verify the certificate using the certificate verification link.
- Required minutes in course – Specify the time students required to spent in the course before the certificate will be available.
- Set protection – Choose the actions you wish to prevent users from performing:
- Modify
- Copy
How to configure Custom Certificate?
Once you have added, click Save and Display at the bottom of the page. On this page, you will see the students who have received the certificate. Under the top navigation bar, click “Edit Certificate” to configure your own certificate.
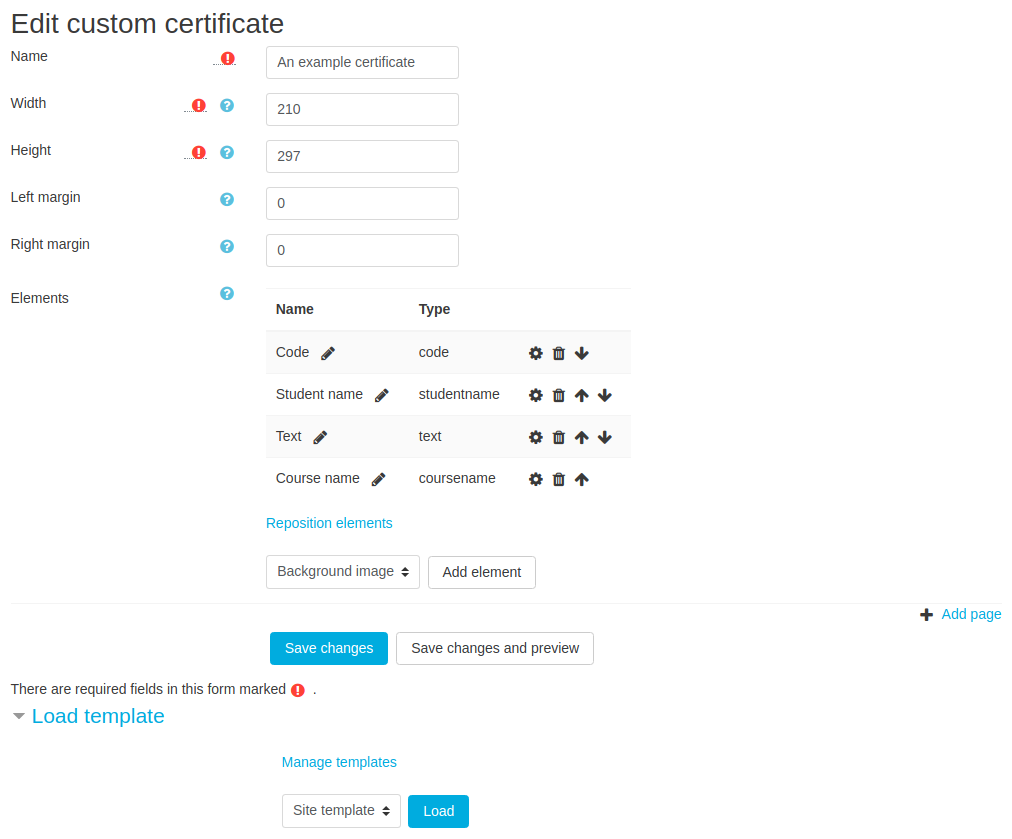
On the top, you can define the name, Width, Height, Left margin and Right Margin for the certificate. Under that you will see the option to add different elements. The elements field includes the options to add:
- Background Image
- Border
- Category Name
- Code
- Course Field
- Course name
- Date
- Date Range
- Digital Signature
- Grade
- Grade Item Name
- Image
- QR Code
- Student Name
- Teacher name
- Text
- User Field
- User Picture
The order of these elements determine when they are rendered on the PDF. So, if you were to add a background image you would want this rendered first. On each element page, you can define its position in X & Y coordinate but if you don’t know how it works, don’t worry as you can drag and reposition elements afterwards.
When you are finished adding all elements, under the list of elements there is a link ‘Reposition elements’ will appear. You can drag and drop all elements into desired area to reposition them as well as edit their properties without having to go back to the edit custom certificate page.
Viewing Issued Certificates
To see all the issued certificates, just click the Custom Certificate activity on the course home page and click on the link ‘View X issued custom certificates’. Once you click on the link you can view the users who have been issued this certificate and also download their version of the certificate.
My Certificates Page for Students
For students who are participating in multiple courses on your Moodle platform, it would be not wise to go to individual course to download their certificates. So, the plugin author provided a separate page under the Profile page to view all certificates issues to a single user. The students can go to their profile and click ‘My certificates’ page to see all the certificates issued to them.
Verifying Certificates
Each certificate when issued is assigned a unique code. There may be cases where a possible future employer might want to check the authenticity of the certificate. So for professional learning courses you might want to use the verify certificate option. With the setting ‘Allow anyone to verify a certificate’ enabled any person with the verification link (including users not logged in) can verify a certificate.
Custom Certificate Templates
Site Admin can set site-wide certificate templates that can be used by users when adding a certificate to a course. To create a template log in as a user who has the appropriate permissions and visit ‘Site administration’ > ‘Plugins’ > ‘Custom certificate’ and click on the link ‘Manage templates’.
So, this is all about the Custom Certificate Moodle plugin and how you can use it in your Moodle course. Do you have any questions about it, please feel free to put them in the comments section below.
For regular updates about Moodle, eLearning and edtech industry, please visit us regularly at https://lmsdaily.com. You can also like us on Facebook or follow us on Twitter.

[…] Moodle plugin allows you to setup a course in such a way that the students can complete the annual recertification easily. The plugin clears all course and activity completion for a user based on the duration set. […]